Thursday, 17 October 2013

Deducting TDS on purchase of a property and generating Form 16B

As per the new government rule with effect from June 1 2013, it is mandatory to deduct TDS (Tax Deduction at Source) of 1% from the seller by the purchaser of an immovable property costing more than 50 lacs.

When to pay the TDS amount to IT department


As per the regulations, the payment needs to be done within 7 days from end of the month in which deduction is made.

How to pay the TDS amount to IT department


For paying the TDS amount to IT department, you need to fill up Form 26QB.
This can be done online by logging into https://www.tin-nsdl.com/
 

Select the option for Form 26QB as highlighted.

For filling this form you would require the following details
1. PAN number of the seller/builder.
2. Address of the seller/builder.
3. Address of the property that you are purchasing.
4. Your personal details like PAN and address.

After entering these details and when you proceed, the Name corresponding to the PAN numbers (Seller/Purchaser) gets displayed as per IT department database, so you can verify the details you had entered.

There is option for paying the TDS amount through net banking with support for most of the reputed banks, so one can easily make the payment.

Save the acknowledgement of Form 26QB and TDS receipt provided by your bank.
You need the details for registering in TRACES (TDS Reconciliation Analysis and Correction Enabling System)

Registering in TRACES for downloading Form 16B

From this part onwards you need to have lot of patience I must say.

You need to register as a Tax Payer (and not as a deductor) for downloading Form 16B in TRACES website https://www.tdscpc.gov.in/en/home.html

Although you may see the option to register as a tax payer using the salary TDS which you were paying all these years, don't waste time trying this. Because this does not work.

Try registering with the details of the TDS you had paid as per Form 26QB. This will not work immediately. You need to wait for a minimum period of 3-4 days for being able to use the details of the TDS you had paid for registering your PAN.
If you are not able to register your PAN even after 4-5 days, then sent a mail with screenshot and details to contactus@tdscpc.gov.in and call their toll free number 18001030344.

Downloading Form 16B

Once you are able to register your PAN, login using the same as user id.
Under Downloads tab, select Form 16B (For Buyer).

You can try entering the details to request for download after another 3-4 days and it won;t work immediately. Probably, it works after 1 week of paying the TDS via Form 26QB.

So, after this period, you can request the download of form 16B. Then you can go to Requested Downloads under Downloads tab for seeing the status of your request. Click on "View All Download Requests" to see your request. After 1-2 hours the request gets approved and you can see the status as available.

Select the download request and scroll down to see the HTTP Download button hiding down. Click on this button to download the form 16B zip file.

But, when you open your form 16B pdf, you will be prompted for a password, but you wont find any hint anywhere about what the password would be. The password for the form 16B pdf is your date of birth in ddmmyyyy format.

Saturday, 3 August 2013

Working of Java RMI And Serialization


Please go through Java RMI Basics before reading this topic.

How does RMI works?


RMI (Remote Method Invocation): RMI enables us to call a Remote java API as if it is a local method and we gets the results. EJBs (Enterprise Java Beans) were primarily built using RMI. Here is what happens behind the scene when you invoke a remote API. RMI requires communication across the network for executing an API on a remote server machine. The remote method invocation is done by using RMI Stub at client side and RMI server handling at server (replacing the earlier version of RMI Skeleton).

Working of RMI
Working of RMI


RMI Stub is generated from the Remote API class using RMI compilation (rmic utility comes with JDK). A remote API requires to implement a Remote interface (Interface extending java.rmi.Remote) for the JVM to identify that this API can be invoked remotely. The Remote API need to extend java.rmi.UnicastRemote for making use of export method in the default constructor and make the Remote Object available to accept client connections by listening on a TCP port.

The Remote API needs to be registered in RMI Registry for making it available for the client access. When then Remote API is registered in the RMI registry, the Remote API Stub object is loaded into the RMI Registry and made available for client invocations. The Remote API does not leave its JVM and it is the stub object that the client receives on lookup.

RMI client access the Remote API via RMI Stub. So, the RMI client needs to have RMI Stub and Remote Interface in the class path. The Remote Interface needs to be there at the client side for the client application to have reference to the Remote API.

Java don't require to generate a skeleton class any more for server side parsing of the RMI client message from Java 1.2. A skeleton for a remote object is a JRMP protocol server-side entity that has a method that dispatches calls to the actual remote object implementation. A sub protocol is introduced that eliminates the need for skeletons.

The client java program performs a lookup in RMI registry to get the RMI Stub of the actual server side implementation. The client side Application makes call to the Remote API via Stub and Stub makes a network socket connection to the server and converts the API invocation data into a byte stream along with relevant method parameters and passes on this information in byte stream.The server side RMI container will listen to such messages sent to the RMI port and passes it on to the RMI Server.

The RMI Server will receive this byte stream information, reconstruct java Objects and uses it to invoke the required Java API implementation. The return value will again go to the Server and get converted into byte stream and RMI container returns it to the client side Stub. The client side Stub reconstruct the return value to the java object and returns to the calling java program.

Need for Serialization


While discussing RMI, we had seen the necessity of sending java objects across the network as byte streams and reconstructing them back as java objects. Here comes the requirement for serialization.

The purpose of serialization in Java is to support transfer an object from one JVM to another. This is done by converting java objects into byte stream so that it can be transported through the network via socket or stored in a file or repository. The transported or stored stream is de-serialized back to java object at the target JVM. In use cases where we have heavy complex object, the byte stream can be written into a database and read back when we require the data to be displayed again.

Steps for making a class serializable


1. Implement Serializable interface: This is an empty interface and have no definitions. This is a marker interface and just tells JVM that this class can be serialized. An instance of a Serializable java object can be written into an ObjectOutputStream for transporting across network or for storing and while deserialization, the stream is taken as ObjectInputStream and read back to Object.

2. All instance variables used in the Serializable class or it's super class should also be Serializable: We may end up having a variable with an inbuilt data type with variables that are not Serializable. For example, elementData of ArrayList.
If the data is not important in the new JVM, we can declare this variable as transient. Transient variables are not considered during serialization.
If the data is important to us, then the ideal solution is to implement custom serialization deserialization logic using writeObject and readObject methods respectively. The JVM will invoke these methods instead of the default methods for serialization.

3. Override equals() and hashCode() if necessary: Suppose if we are making a deep copy of the java object using serialization, the default equals() method would return false as it compare the reference of the java objects but they are the copy of same objects. In such cases, we may require to override equals() and hashCode() methods.

Serial Version UID and its significance

What happens if the class definition of the JVM is old from the current version of the serializable object? What if a new property is added to the Serializable object and the remote JVM does not know about it?
When the class is serialized, the serial version UID is serialized along with other contents. The JVM which deserializes the object compares the serial version UID of loaded class with that in the content.
If they do not match, then InvalidClassException is thrown.
In such scenarios, the more desirable behaviour is to ignore the value of the newly added variable for backward compatibility. For achieving this, we can declare the serial version UID ourselves. This means the logic of JVM will not be used for generating the serial version UID. If the serial version UID of two class definitions are same, there won't be any exception thrown and the newly added variable will have the default value.

For creating a sample RMI Application, please go through Java RMI Basics


Friday, 2 August 2013

Java RMI Basics With Example

Remote Method Invocation (RMI)

RMI is a mechanism to create a distributed application or a multi-tiered application in Java. RMI allows an object to access Remote APIs in a separate server there by allowing the application to be split into separate tiers like web tier, business tier, persistence tier etc.
The details of working of RMI is covered at Working of Java RMI And Serialization
You can go through Working of Java RMI after finishing this chapter.

How to write a simple RMI application


Following are the steps for developing a simple RMI program:

(1) Create an interface for your API to be invoked remotely, extend it with java.rmi.Remote

The interface of the API that needs to be invoked should extend java.rmi.Remote for the JVM to identify itself as an interface whose methods can be invoked from another JVM.
A sample interface is given below:


package com.prasune.rmi;

import java.rmi.Remote;
import java.rmi.RemoteException;

public interface TestRemote extends Remote {

      public String execute(String message) throws RemoteException;
}


(2) Implement your Remote API and extend it with java.rmi.server.UnicastRemoteObject

We are extending Remote API Implementation with java.rmi.server.UnicastRemoteObject to make use of its constructors that export the object. Exporting a remote object makes it available for client calls by listening on a TCP port.
The exportObject method returns a Remote stub object of the acual implementation and the Remote API implementation remains in the JVM in which it was created.

package com.prasune.rmi;

import java.rmi.RemoteException;
import java.rmi.server.UnicastRemoteObject;

public class TestRemoteImpl extends UnicastRemoteObject implements TestRemote {

      public TestRemoteImpl() throws RemoteException {
            super();
      }

      @Override
      public String execute(String message) throws RemoteException {
            System.out.println("Received message: " + message);
            return "Invoked remote method successfully";
      }    
}


(3) Create a RMI server class to register the remote implementation in RMI Registry

This is a class for registering the Remote API Implementation in RMI Registry so that the export method of UnicastRemoteObject makes the API available for incoming RMI client invocations.

package com.prasune.rmi.server;

import java.net.MalformedURLException;
import java.rmi.Naming;
import java.rmi.RemoteException;

import com.prasune.rmi.TestRemote;
import com.prasune.rmi.TestRemoteImpl;

public class TestRMIServer {

      public static void start() throws RemoteException, MalformedURLException {
            TestRemote test = new TestRemoteImpl();
            Naming.rebind("rmi://localhost:1099/TestRemoteService", test);
      }

      public static void main(String[] args) throws RemoteException,
                  MalformedURLException {
            TestRMIServer.start();
      }
}


(4) Create a RMI Client class in a separate java project, which does the look up of the remote object and access the remote API via stub. You need to copy Remote interface to the class path or copy the Remote Interface source file.

The RMI client code looks up the RMI Registry to get the Remote Object Stub registered by the server. This returns RMI stub of the implementation. The RMI client application invokes the Remote API on the stub of actual implementation.

package com.prasune.rmi.client;

import java.net.MalformedURLException;
import java.rmi.Naming;
import java.rmi.NotBoundException;
import java.rmi.RemoteException;

import com.prasune.rmi.TestRemote;

public class TestRMIClient {

      public static void main(String[] args) throws MalformedURLException, RemoteException, NotBoundException {
          TestRemote test = 
(TestRemote) Naming.lookup("rmi://localhost:1099/TestRemoteService");
            System.out.println(test.execute("RMI invocation"));
      }
}


(5) Compile the all the files (will happen by default if you are using an IDE)

(6) Generate Stub class by using rmic command:

You will have rmic utility in your JDK/bin.
Go to command prompt.
Got to directory in which class files are generated.
execute rmic.exe com.test.rmi.TestRemoteImpl from this location.
This will generate TestRemoteImpl_Stub.class

(7) Start the RMI Registry

You will have the RMI registry in your JDK/bin which you can make use of. The default port of RMI Registry is 1099, you can start on a port of your choice by specifying the port in rmic command. In that case, the binding URL needs to be changed accordingly.

(8) Run the Server side class

Once the registry is started, you can start the server. The RMI registry needs to know the RMI server code base to download and register RMI stub in its registry. So, if you run the RMI Server program now, you may get ClassNotFound exception for the RMI stub.

To handle this problem, set the java.rmi.server.codebase property. The property requires that a directory path be terminated with a forward slash.
Example:
-Djava.rmi.server.codebase=file:D:\TestRMI\rmi\bin\


(9) Copy the generated stub to client project class path and Run the Client side class(at another JVM)
The remote object we gets via lookup is the object of the stub class and the remote object is invoked through this stub like a local method.

Output:
The server JVM will show a print of "Received message <message you pass as parameter>".
The client JVM will show a print saying "Invoked remote method succesfully".

Now, you can go through the details of working of RMI is covered at Working of Java RMI And Serialization


Saturday, 27 July 2013

Mutual Fund Basics

What do we know about mutual funds?

I think what everyone knows about mutual fund is that “Mutual funds are subjected to market risk. Please read your offer documents carefully before investing”.

What are the market risks mentioned here? Are mutual funds subjected only to market risks?


Market risks includes risk associated with equity investments, change in interest rates, foreign exchange risk, commodity risk etc. If mutual funds are subjected only to market risk, then how would different funds perform differently? Aren’t they all supposed to be performing same way for at least mutual funds in same sector? Here comes the role of fund manager and his approach. This is also one of the key aspects of performance of a mutual fund. The key to a mutual fund is how the fund manager mitigates the market risk without impacting the performance of the fund scheme. The role of a mutual fund manager includes selecting the stocks that will deliver, diversifying the schemes and everything possible to do the balancing of risk Vs return.

Importance of market research

Even if we want to invest in shares of only one company we need to do lot of research before taking a decision. It takes lots of time and effort. The concept of mutual fund has significance at this context. 

Mutual Funds are kind of collective investment schemes, which are professionally managed by a Fund manager. The money for a mutual fund is pooled from many investors and is invested in stock, bonds short term money market instruments and other securities. Mutual funds are relatively less expensive as with minimum investment amount investor gets maximum diversification. 

Net Asset Value (NAV) of Mutual Fund:

NAV is the per share market value of a mutual fund. While buying a mutual fund, the number of shares are allotted by dividing the invested money with NAV. 
NAV of a mutual fund is calculated as below:
(Total value of all the cash + securities -   liabilities if any)/Number of shares. 
An NAV computation is undertaken at the end of each trading day based on the closing market prices of the portfolio's securities. Liabilities would include charges for fund manager and his team.

Setting Up a Mutual Fund

Mutual funds have got a 3 tier set up. First the sponsor who wants to set up a mutual fund approaches SEBI (Securities and exchange board of India). SEBI does a back ground check of personal integrity and financial sector experience etc and gives the approval. Sponsor then set up a public trust under Indian trust act 1882. According to this act it’s not a legal entity. So trustees act on behalf of them. Once after this trust is registered with SEBI it’s known as Mutual fund. The last level is AMC (Asset management company). Actual money management of investors are done by AMC.
When a new scheme is launched, it is known as new fund offer or NFO.

Investment Procedure

First the investor has to fill the NFO available with the distributor. He is supposed to read the offer document (OD) thoroughly. At least he should read the key information memorandum (KIM) available with the application. Investor has to give the cheque or draft (MF cannot collect cash). Mutual fund will give this cheque to the corresponding bank in which it has the account.

Different Type of Investment Plans:


Lump Sum Investment Plan or One Time Investment Plan: In this type of investment plan, the whole amount is invested as lump sum in a single go. This type of investment plan has got higher risk depending on the market performance from the time of buying the mutual fund.

Systematic Investment Plan (SIP): In this type of investment plan, the investment is done in instalments. There will be an effective averaging of NAV (Net Asset Value) of the mutual fund in this type of plans. So, the risk will be lesser in case of SIPs due to averaging of NAVs of various instalments. At the same time, you may be loosing on potentially higher returns of one time investment based on market performance.

Different Type of Mutual Fund Products:


Equity fund products are comparatively riskier one and the probability of higher return is also more in this case. This product can be either open ended or closed ended. Open ended products allow the investor to enter and exit the scheme at his convenience. But in case of closed ended product the investor can invest only during the NFO period. And even the redemption also happens only after the specific period mentioned in the scheme.
In equity funds, Index funds are considered as the safer one as it’s a diversified and large cap fund. It’s a passively managed one. But sector funds come under the risky category.
Again based on market capitalization equity funds are divided as

  •  Large cap-Stable and safe top 100/200 actively managed companies.
  •  Mid cap- more expense to do the market research.
  •  Small cap- relatively higher risk
The commonly knows equity fund linked schemes are growth scheme and value scheme. Growth schemes invest in the stocks of the companies where the growth is expected more than the average. But in case of value scheme the investment is done in relatively low profile companies and expecting the stock price to grow over years.

Exchange Traded Funds (ETFs)
These are the mutual fund units which investor buy or sell from the stock exchange. Here the AMC deal with the APs (Authorized Participant) few designated participants. This is comparatively less expensive and investor require one demat a/c for the trade. It can be on the basis of gold, silver, indices etc.

  • Gold Exchange Traded Funds (ETFs): Here the investment is in gold or gold related securities. This is as good as buying gold where there is no treats as keeping gold. Upon maturity investor can realize this on the prevailing rate of gold ETFs. Here again we have a custodian who does the safe keeping of physical gold.

Debt Funds
These are relatively safer funds. Debt market in India is not an easily accessible one. So mutual fund industry helps the investor to trade in debt instruments. The two major risks in the debt securities trade are interest rate risk and credit risk. The interest rate risk can be overcome by investing in relatively short duration schemes. The credit risk arises mainly when the borrower turns to bankrupt. To overcome this there are credit rating agencies like CRISIL and ICRA which gives the rates from “AAA” to “D”(defaulter).
Price in a bond is calculated as the present value of future cash flow. YTM (“Yield to Maturity” denotes the rate applied to future cash flow.

     Different schemes available are mentioned below:

  •  Fixed Maturity Plans- it’s a closed end scheme where the investor is assured of fixed income.
  •  Capital Protection scheme - Here a portion of the fund is invested in debt instruments and other portion in derivative instruments like options.
  •  Gilt funds- This scheme will invest only in the securities issued by government. It’s safer one.
  • Balanced/hybrid funds - here 50% investment tin debt instruments and other 50% in equity schemes.
  • Monthly Income Plans (MIP- Here the dividends are payee monthly.
Liquid funds.
Liquid funds are the biggest contributor of mutual fund industry. All the schemes with less than one year maturity are called liquid funds. Few of the widely traded liquid funds are commercial papers, certificate of deposit treasury bills etc.


Monday, 22 July 2013

An introduction to ORM and Hibernate

For years EJB Entity Beans was the only persistence framework which managed transaction and concurrency in java. Entity Beans required a server for running and was difficult to code and debug.

ORM (Object Relational Mapping) frameworks came into picture as a lightweight and simpler alternative to EJB 2.0 entity beans as a persistence framework that manages transaction and concurrency. All the ORM based persistence framework has the agenda of mapping a defined POJO (Plain Old Java Object) entity to a database table. There will be a mapping file defined for mapping the java object to database table. In the newer version of ORMs, there is alternate mapping via annotations. These ORMs can run in server and non-server environment.

Hibernate is arguably the most prominent ORM based persistence framework available in the market for java. There is NHibernate available for .NET solution.
Some of the most prominent ORMs in java are:

  • Java Persistence API (JPA) - We will discuss JPA also to some extent here.
  • Toplink
  • iBATIS
  • Java Data Objects (JDO)

Why ORM frameworks?

  • One of the biggest advantage of using an ORM comes while we require multiple database support in a project. The ORM will take care of converting the SQL query syntax based on the underlying database using SQL Dialect.
  • ORM frameworks saves a lot of development time as it generates the SQL files and takes care of the execution. So, developer needs to take care of just populating the data object and does not have to take care of the sql symantics, setting parameters etc. there by saving development and debugging time.
  • Developers can concentrate more on business logic than managing persistence as the business objects will get directly mapped to the data in database.

ORM Vs Plain JDBC

  • ORM frameworks are slower than JDBC as it is a wrapper over JDBC and the additional query generation work needs to be done at run time using reflection and the provided mapping metadata. But most of the ORM frameworks uses caching frameworks to cache the data managed by the framework and retrieve it from cache enhancing performance. Also, on application startup, these frameworks loads all the mapping/annotated data to enhance performance.
  • Developer needs to learn and have expertise in the ORM framework to deal with the practical issues.

JPA (Java Persistence API): 

We also have JPA which is the replacement for Entity Beans in EJB 3.0.
JPA is an abstraction layer above all other persistence frameworks. They provides a plugin to these persistence frameworks. So, if you want to use hibernate as your persistence provider for JPA, just we need to mention that in the config file. Tomorrow if you see some other persistence provider will be better to serve your requirement, you can do so without much impact using JPA.

High Level Architecture and Working of Hibernate:


Configuration:
Hibernate application would be having two configuration files

  1. hibernate.properties 
  2. hibernate-cfg.xml 
The connection details, customized connection pooling for non-server environments, mapping data of various database tables to java POJOs etc. are stored in these files. For modularisation, hibernate-cfg.xml may refer to multiple mapping files in which the table to POJO mapping exists. From hibernate 3.0 onwards, mapping can also be done via annotations.

The hibernate properties file needs to be loaded by creating a hibernate configuration object as below:
new Configuration().configure();

Session Factory Object:
Based on the hibernate configuration, a session factory is created. This session factory manages the connection pool and provides connection sessions to the user as requested.

Session factory is created using below code:
sessionFactory = new Configuration().configure().buildSessionFactory();

Session Object:

A session object represents a physical database connection session. Persistent objects are managed via session object.

Session object creation code:
Session session = sessionFactory.openSession();

Transaction Object:
Transaction represents a single unit of work with the database. Transactions in hibernate gets managed by the underlying transaction manager which will be JTA or JDBC.

Transaction tx = session.beginTransaction();

Entity POJO:
With the transaction ready, all you need is the entity POJO. This is a simple java bean having properties defined as the member variables with their respective getter/setters. The java bean to table mapping can either be annotated or mentioned in a mapping file along with the mapping/annotation of java class properties to database columns.

The session object has got various methods for the DML operations to take place and finally the transaction can be committed or rolled back based on its success.

Query Object:
The query objects use HQL (Hibernate Query Language) or SQL to fetch data from database.

Criteria Object:
Criteria object is used to create and execute where clause or the filter criteria to fetch data from database.

Sunday, 14 July 2013

Finance: Introduction to Derivatives

Before coming to derivatives, let us talk about a simple trade between a farmer and a miller.

A farmer and a miller makes an agreement to trade wheat at a particular price in future. This would guard both farmer and miller against uncertainty in price. The farmer will loose any additional gains he could have achieved if there is a price rise. If the price falls, the miller will have to pay additional money for purchasing wheat thereby making a loss. This agreement can be termed Forwards. Forwards are one type of derivative trade and if you understood this trade example, you got the base of derivatives.

Derivatives are the financial instruments whose returns are derived from an underlying assets. In case of the example we discussed, the underlying asset is wheat and futures price and agreement would be decided based on the price of underlying asset, i.e. wheat. The underlying assets can be based on real physical assets (like agricultural commodities,metals etc.) or financial assets like stocks, currencies etc.

Hedging: Derivatives are used by companies and individuals to transfer any undesired price risk or unpredictability of price to another party. The other party takes the unpredictability of price risk and may achieve gain or loss based on the price of underlying commodity at the time of trade execution.
In case of the example we discussed, the farmer has hedged or removed any price risk he may have to face at the time of harvest.

Speculation and Arbitrage: The typical example of a speculator is a person who trades in stock market with the motto of making profits and is not looking forward for a physical trade. The person who buys a derivative to acquire price risk and therefore look to make financial gains out of it based on some speculations and forecast is called a speculator.

Derivatives can be classified as exchange traded and over the counter (OTC) traded.

Over The Counter (OTC) Traded derivatives

These are contracts that are traded directly between two parties without going to a regulated exchange. There is counterparty risk associated with an OTC trade.

Exchange Traded Derivatives

These are contracts that are traded over a regulated exchange. Each trade happens with an exchange and not directly with a counterparty. Since, exchange is the counterparty for trades happening over the exchange there is no counterparty risk involved here.

Types of derivative contracts:


1. Options: Options precisely means that the holder has an option to whether or not execute the trade contract. Option gives the option buyer right and not obligation to whether or not execute the trade contract.
The option buyer pays the seller an amount of money called as premium. An option to buy something is called as call and an option to sell something is known as put.
The maximum loss that an option buyer can incur is the premium itself. This is because the option buyer will execute the underlying trade only if he gets some profit. So, the option buyer can have profit of any margin and maximum loss equivalent to premium. Inversely, the maximum profit that an option seller can get would be option premium and the loss can be of any magnitude. Options can be OTC or exchange traded.
Different type of options are European option, American option, Average price option.
American option can be executed at any time before expiry, European option can be exercised only on contracted expiry date. In case of Average price option, option is exercised with average price over the settlement period.
In India, we use European options.

2. Forward Contracts: Forwards are tailor made contract between two parties that is to be executed at a future date at an agreed price. This is strictly an OTC traded derivative. The need for such a contract lies in the customization requirement of the agreement between two parties that is agreed to be done in future. If the parties are intending to do a physical transaction of traded commodity, then there needs to be  an agreement on quality of the commodity, penalty for delay etc.

3. Future Contracts: A future contract is also a contract between two parties that is to be executed at a future date at an agreed price like Forwards. But Forwards is strictly traded over the exchange and is targeted for speculators. Future contracts are traded on organized exchanges called futures markets.

4. Swap contracts: Swap is a contract in which two parties agree to exchange cash flows. This can be based on two fixed prices or floating prices. An example of swap trade is agreement between airline and fuel company. Fuel company agrees to provide a fixed price for the airline fuel at a mentioned date and the airline company is ready to give the average price on exchange index in return.

5. Exotics: There are hybrid derivatives which are combinations of one or more of the above derivatives.

Tuesday, 9 July 2013

Configuring Websphere MQ for messaging on windows with JMS

Configuring Websphere MQ for messaging on windows


1.  Create Queue Manager and Queues required for the application.

 Create queue manager
 In the websphere MQ console, Right click on queue managers->new->queue manager


 Enter queue manager name and click next till step 3
 On step 3, check the box for create server connection channel and click next

 If the default port number 1414 is already in use by some other queue manager then change the port number and click finish

Create Queue for receiving messages

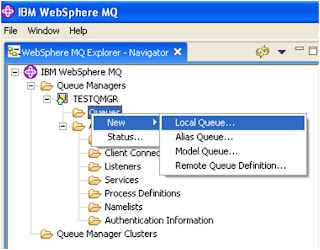
Under Queue Manager Click new-> local queue


 Enter queue name and click finish
Similarly, you can create a queue for putting acknowledgement/response messages back after processing as required.

Generate a binding file for configuring queue managers with queue connection factories and queues with queue destinations.

1)    Go to websphere mq installation directory/java/bin
2)    Edit JMSAdmin.config
Uncomment the following values and comment other properties

INITIAL_CONTEXT_FACTORY=com.sun.jndi.fscontext.RefFSContextFactory
PROVIDER_URL=file:/C:/JNDI-Directory
SECURITY_AUTHENTICATION=none

Create a directory as there in provider url or change the provider url to the location where you want to generate .bindings file.
      Run JMSAdmin.bat
      You will get an InitCtx prompt.

            Use the commands below for creating and binding queue connection factory and queue destinations and binding them with queue manager and queues.

1)Def qcf(<name of queue connection factory>)  qmgr(<queue manager name>) transport(client) port(<port number>)
2)def q(<queue destination name>) qmgr(<queue manager name>) queue(<queue name>)
(create for both sender queue and receiver queue as shown in the snapshot.)


Configuring JMS for receving/consuming messages:

The queue connection factory and queue destination can be defined in ejb-jar.xml or via j2e server's UI for configuring a message driven bean (MDB).

You can configure your own MessageListener as follows:
1. Create QueueSession - For this you need to provide jndi lookup address for QueueConnectionFactory and QueueDestination. These are used for creating a QueueSession as below.
     Hashtable env = new Hashtable();
env.put(Context.INITIAL_CONTEXT_FACTORY,                   "com.sun.jndi.fscontext.RefFSContextFactory");
env.put(Context.PROVIDER_URL, "file:/C:/JNDI-Directory");
Context jndiContext = new InitialContext(env);
QueueConnectionFactory queueConnectionFactory = 
(QueueConnectionFactory) jndiContext.lookup("<name of queue connection factory>");
Queue queue = (Queue) jndiContext.lookup("<queue destination name>");
queueConnection = queueConnectionFactory.createQueueConnection();
queueSession  = queueConnection.createQueueSession(false, Session.AUTO_ACKNOWLEDGE);

2. Registering the Listener:
                MessageConsumer consumer = queueSession.createConsumer(queue);                
                MessageListener listener = new MyListener();
                consumer.setMessageListener(listener);
                queueConnection.start();

3. Creating own Listener:
Listener class should implement jms MessageListener interface and onMessage(Message message) will have your jms message which you can process further.

4. Sending back acknowledgement or putting message via direct lookup:
You can create a queuesession as discussed earlier.
For the reply queue or acknowledgement queue creation, you can follow the below steps:
               queueSender = queueSession.createSender(queue);
               TextMessage textMessage = queueSession.createTextMessage();
textMessage.setText("Test Message");
queueSender.send(textMessage);


Various Singleton approaches in Java

Java Singleton

There are several approaches in Java to create a singleton class. The various methodologies and their pros and cons are discussed here:

1) Eager Initialization:

In case of eager initialization, the singleton is instantiated when the programs starts whether or not it gets used. The problem with this approach is that valuable resources are allocated whether or not they ever get used. If you are uncertain on whether your singleton object will be used or not and the singleton has a large memory footprint, this may not be a good choice.

public class Singleton {

    // Eager initialization happens here.
    static private Singleton instance = new Singleton();

    // Prevent instantiation by public.
    private Singleton() {
    }

    public static Singleton getInstance() {
        return instance;
    }
}

Eager initialization relies on the fact that the JVM will initialize the class members upon loading the class. And the class is loaded when it is first referenced.


2) Lazy Initialization:

In case of lazy initialization, the object only get instantiated on the first time the getInstance() method is called. This has the advantage of not allocating the resources unless it is actually needed. The problem with this approach is that the getInstance() method needs to be synchronized. Therefore there is a performance hit when acquiring the singleton on subsequent calls.

public class Singleton {

    static private Singleton instance = null;

    // Prevent instantiation by public.
    private Singleton() {
    }

    synchronized public static Singleton getInstance() {
        if (instance == null) {
            // Lazy initialization happens here
            // on the first call to this method.
            instance = new Singleton();
        }
        return instance;
    }

}

The subsequent calls for fetching the singleton object will have to go through the synchronization block which is a performance hit. This will also result in parallel threads in wait stage.


3) Lazy Initialization with double check:


This is a methodology is used to overcome the performance issue with lazy initialization. We do a double check to ensure that the subsequent calls for acquiring singleton object after its creation does not have to go through a synchronized block.

public class Singleton {


    private volatile Singleton instance = null;
    
    // Prevent instantiation by public.
    private Singleton() {
    }
public static Singleton getInstance() { if (instance == null) { synchronized(
Singleton.class) { if (instance == null) { instance = new Singleton (); } } } return instance; }
}

But this approach fails in a multiprocessor environment and is not recommended.
Further details : http://www.javaworld.com/javaworld/jw-02-2001/jw-0209-toolbox.html

4) On Demand Initialization with a holder class:

This method relies on the JVM only intializing the class members upon first reference to the class. In this case, we have a inner class that is only referenced within the getInstance() method. This means SingletonHolder will get initialized on the first call to getInstance().

public class Singleton {

    // Prevent instantiation by public.
    private Singleton() {
    }

    public static Singleton getInstance() {
        return SingletonHolder.instance;
    } 

    /**
     * Singleton implementation helper.
     */
    private static class SingletonHolder {
        // This gets initialized on first reference
        // to SingletonHolder.
        static final Singleton instance = new Singleton();
    }
}

In this case, the singleton object will not get allocated until it is used and we did not need to incur the overhead of a synchronized method call.
The only issue we have here is that a serialization/deserialization or by using reflection, we can create a new instance of this singleton class. For solving the serialization/deserialization scenario breaking the singleton, we can override readresolve() method. For handling the instance creation via reflection, all we can do is to enable java security manager property. This will restrict the access of private constructor via reflection.

5) Enum approach with Java 5:

There is one more, probably the best way to do it if you are using Java >= 1.5 according to 'Effetive Java' author 
Joshua Bloch. I personally feel that the above methodology(number 4) is the best approach among all. 
In Java 5 and above, you can use Enum – this way you get Singleton functionality easily and don’t have to think about serialization as you get it for free:


public enum YourSingleton {
INSTANCE;

public void doStuff(String stuff) {
System.out.println("Doing " + stuff);
}
}

Now you can use it and be completely sure it’s Singleton:
You can make call to the methods as following:
Singleton.INSTANCE.doStuff("some stuff");