Configuring Websphere MQ for messaging on windows
1. Create Queue Manager and Queues required for the application.
Create
queue manager
In the websphere MQ console, Right
click on queue managers->new->queue manager

Enter queue manager name and click next till step 3
On step 3, check the box for create server connection
channel and click next
If the default port number 1414 is
already in use by some other queue manager then change the port number and click
finish
Create Queue for receiving messages
Under Queue Manager Click new-> local
queue
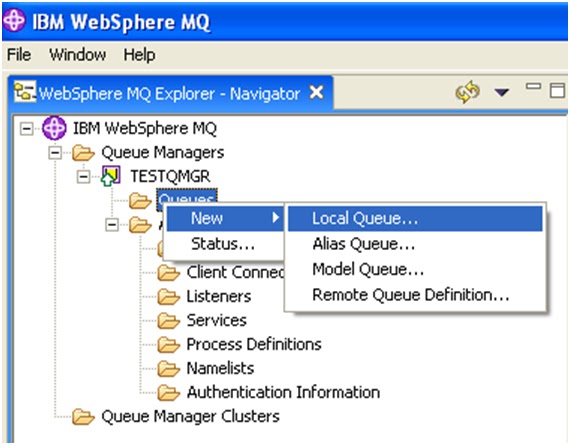
Enter queue name and click finish
Similarly, you can create a queue for
putting acknowledgement/response messages back after processing as required.
Generate a binding file for configuring queue managers with queue connection factories and queues with queue destinations.
1) Go
to websphere mq installation directory/java/bin
2) Edit
JMSAdmin.config
Uncomment
the following values and comment other properties
INITIAL_CONTEXT_FACTORY=com.sun.jndi.fscontext.RefFSContextFactory
PROVIDER_URL=file:/C:/JNDI-Directory
SECURITY_AUTHENTICATION=none
Create
a directory as there in provider url or change the provider url to the location
where you want to generate .bindings file.
Run JMSAdmin.bat
You
will get an InitCtx prompt.
Use the
commands below for creating and binding queue connection factory and queue
destinations and binding them with queue manager and queues.
1)Def qcf(<name of queue
connection factory>) qmgr(<queue
manager name>) transport(client) port(<port number>)
2)def q(<queue
destination name>) qmgr(<queue manager name>) queue(<queue
name>)
(create for both sender
queue and receiver queue as shown in the snapshot.)
Configuring JMS for receving/consuming messages:
The queue connection factory and queue destination can be defined in ejb-jar.xml or via j2e server's UI for configuring a message driven bean (MDB).You can configure your own MessageListener as follows:
1. Create QueueSession - For this you need to provide jndi lookup address for QueueConnectionFactory and QueueDestination. These are used for creating a QueueSession as below.
Hashtable env = new Hashtable();
env.put(Context.INITIAL_CONTEXT_FACTORY, "com.sun.jndi.fscontext.RefFSContextFactory");
env.put(Context.PROVIDER_URL, "file:/C:/JNDI-Directory");
Context jndiContext = new InitialContext(env);
QueueConnectionFactory queueConnectionFactory =
(QueueConnectionFactory) jndiContext.lookup("<name of queue connection factory>");
Queue queue = (Queue) jndiContext.lookup("<queue destination name>");
queueConnection = queueConnectionFactory.createQueueConnection();
queueSession = queueConnection.createQueueSession(false, Session.AUTO_ACKNOWLEDGE);
2. Registering the Listener:
MessageConsumer consumer = queueSession.createConsumer(queue);
MessageListener listener = new MyListener();
consumer.setMessageListener(listener);
queueConnection.start();
3. Creating own Listener:
Listener class should implement jms MessageListener interface and onMessage(Message message) will have your jms message which you can process further.
4. Sending back acknowledgement or putting message via direct lookup:
You can create a queuesession as discussed earlier.
For the reply queue or acknowledgement queue creation, you can follow the below steps:
queueSender = queueSession.createSender(queue);
TextMessage textMessage = queueSession.createTextMessage();
textMessage.setText("Test Message");
queueSender.send(textMessage);
No comments:
Post a Comment